Azure Container Instances allow you to run a docker container in Azure without managing virtual machines or learning new tools. Running a node in the cloud gives you the ability to deploy nodes and provision additional resources with simplicity and speed.
There are two ways to get a Runly node up and running in Azure: via the GUI or using only CLI tools.
CLI
You can use Azure Cloud Shell or install the Azure CLI locally to run these commands.
To run the latest version of the node using Azure defaults:
New-AzContainerGroup -ResourceGroupName Runly -Name MyRunlyCloudNode -Image runly/runly:latest -OsType Linux -EnvironmentVariable @{"RUNLY__APIKEY"="<API Key Here>"}Be sure to replace <API Key Here> with your cluster API key. You can also replace the resource group and container name with something more appropriate.
See the Azure Container Instances Quickstart for more detailed information.
Run Multiple Containers in a Single Container Group
You can also run multiple nodes within a single container group in ACI.
Create a nodedeploy.json file with the following contents:
{
  "$schema": "https://schema.management.azure.com/schemas/2015-01-01/deploymentTemplate.json#",
  "contentVersion": "1.0.0.0",
  "parameters": {
    "containerGroupName": {
      "type": "string",
      "defaultValue": "<Container Group Name>",
      "metadata": {
        "description": "<Container Group Name>"
      }
    }
  },
  "variables": {
    "runlyApiKey": "<API Key Here>",
    "container1name": "<Container Instance Name 01>",
    "container1image": "runly/runly:latest",
    "container2name": "<Container Instance Name 02>",
    "container2image": "runly/runly:latest"
  },
  "resources": [
    {
      "name": "[parameters('containerGroupName')]",
      "type": "Microsoft.ContainerInstance/containerGroups",
      "apiVersion": "2018-10-01",
      "location": "[resourceGroup().location]",
      "properties": {
        "containers": [
          {
            "name": "[variables('container1name')]",
            "properties": {
              "image": "[variables('container1image')]",
              "resources": {
                "requests": {
                  "cpu": 1,
                  "memoryInGB": 1.5
                }
              },
              "environmentVariables": [
                {
                  "name": "RUNLY__APIKEY",
                  "value": "[variables('runlyApiKey')]"
                },
                {
                  "name": "RUNLY__NODENAME",
                  "value": "[variables('container1name')]"
                }
              ]
            }
          },
          {
            "name": "[variables('container2name')]",
            "properties": {
              "image": "[variables('container2image')]",
              "resources": {
                "requests": {
                  "cpu": 1,
                  "memoryInGB": 1.5
                }
              },
              "environmentVariables": [
                {
                  "name": "RUNLY__APIKEY",
                  "value": "[variables('runlyApiKey')]"
                },
                {
                  "name": "RUNLY__NODENAME",
                  "value": "[variables('container2name')]"
                }
              ]
            }
          }
        ],
        "osType": "Linux"
      }
    }
  ]
}
Be sure to set the container group name, container instance names, and cluster API keys. The sample json file above passes the API key stored in runlyApiKey to all the container instances. You can modify this behavior if you need to pass different API keys to further segment your infrastructure. The containername variables (container1name, container2name, etc) should be unique. This is how Azure identifies each container instance and Runly identifies each node.
Create the container group:
az deployment group create --resource-group <Resource Group Name> --template-file nodedeploy.jsonBe sure to set the resource group name.
GUI
If CLIs aren’t your thing, you can also set your node up in ACI using the Azure Portal.
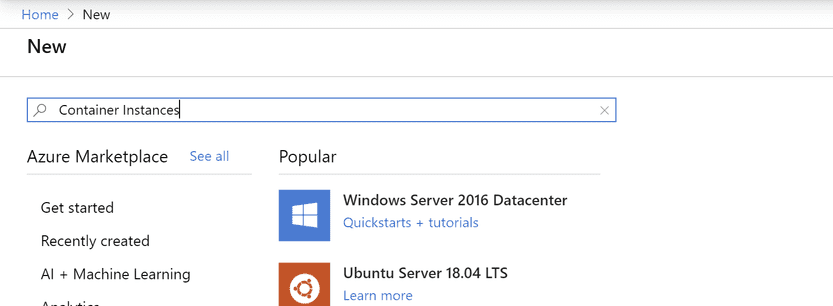
Create a resource

Search for container instances

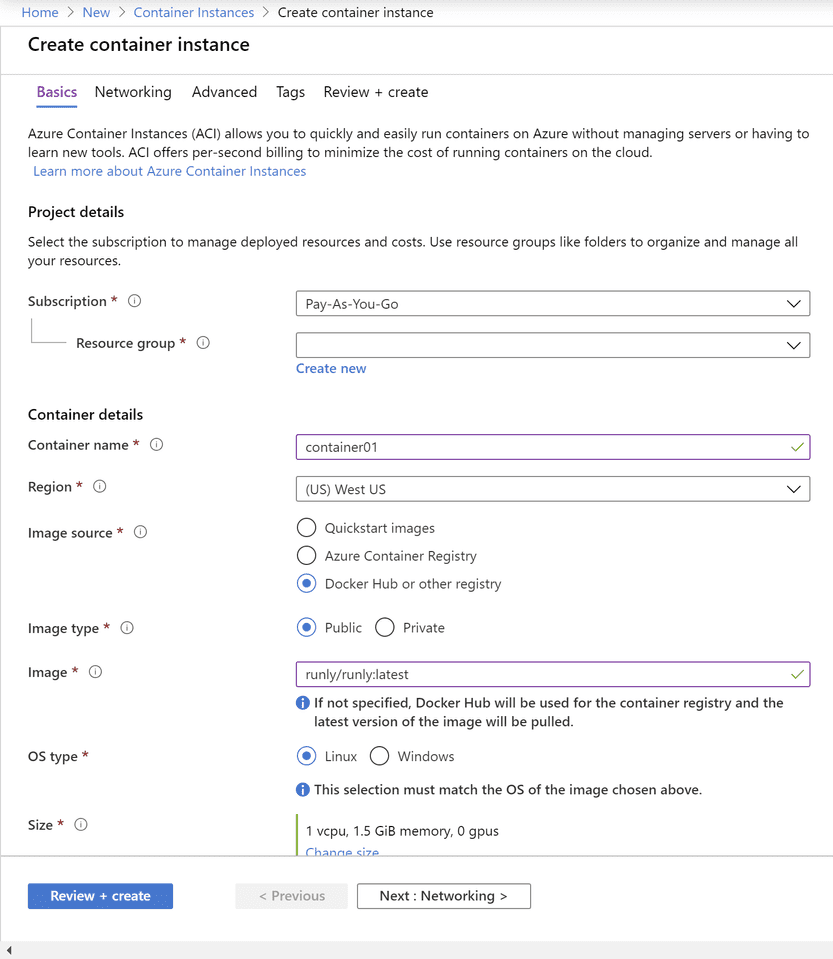
Create a container instance

Complete the Basics tab.
- Image source: select Docker Hub or other registry
- Image type: select Public
- Image: type in runly/runly:latest

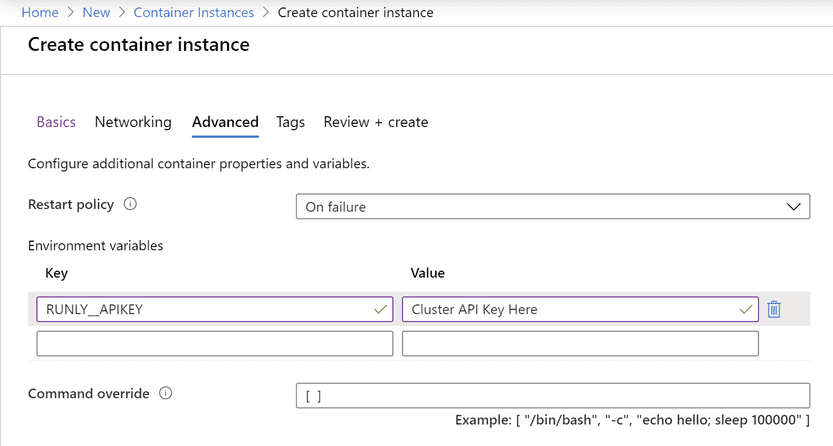
Set Runly API Key as an environment variable

Finish creating your container